Products
Solutions
Resources


When it comes to creating and managing a website, you just can't beat content management systems.
Mature CMS platforms like Webflow come with a range of templates and themes, which can be customized through a user interface that doesn't always require deep coding knowledge. You start by choosing a template that aligns with your vision, and from there, you can use the CMS’s built-in tools to add and arrange your content—text, images, videos, and more.
Plus, unlike headless CMSs, traditional CMSs provide a more structured environment for creating web pages.
Some advantages of using a CMS include:
Templates
In a traditional CMS, you typically begin with a selection of templates or themes that give you a foundational layout. These templates are highly customizable within the CMS environment, providing various design options such as color schemes, font choices, and element placements.
This becomes a bit more challenging if you already have a brand style guide in mind, because you’ll need to customize the CMS theme to match your brand. It’s easier than starting from scratch, but it still means you won’t quite be able to use a theme out of the box.
Intuitive content editing
Once you’ve chosen a template, the content editor within a traditional CMS allows you to add and format your text, insert media, and create links using what is often a WYSIWYG-esque editor.
This interface closely resembles graphic software like InDesign, making it relatively straightforward for non-technical users to create and manage content.
The downside, however, is that it’s not as straightforward as a drag-and-drop editor. You’ll need to create global styles upfront for all of your web elements including styling, padding, and the like, otherwise your web pages will still have the generic template stylings applied to them.
Unlike drag-and-drop editors, you’ll want to do thorough testing to make sure that pages render properly when loaded in a browser, as it’s not always a 1:1 like with drag-and-drop editors. Think of the content editing process as creating CSS modules and text stylings, and then dragging and dropping those to compose a web page.
Global stylings
A traditional CMS allows users to define styles for different elements—like headers, paragraphs, and links—that will be consistent across all pages. You set these once per project (or website), and the CMS ensures that they apply everywhere, saving time and enforcing brand consistency.
Headless content management systems will inherit all the stylings from your existing CSS, and solely serve to provide content on demand.
Dynamic content and SEO
Most traditional CMS platforms are equipped with powerful tools for dynamic content creation and SEO optimization. Most templates have built-in features for meta tags, opengraph images, friendly URL structures, and even social media integration, making it easier to manage how your content will be discovered and shared online.
It’s also straightforward to bake SEO directly into your CMS template, giving you the ultimate control over your site’s optimization. For instance, if you want to specify meta title and meta description for every blog post published, you simply add those fields into the content model, configure them to display in the <head> of each web page published with that content model, and you’re good to go.
Pro SEO tip: You can use JSON tags filled with dynamic CMS content in the <head> of your blog pages to automatically communicate structured data to search engines and site crawlers, like author, publish date, content type, read time, and more. Right-click and view this page's source to steal the JSON code for this. 😉
Plugins
Adaptability through third-party tech is another significant advantage of traditional CMS platforms.
With a wide array of plugins and add-ons available, you can enhance the functionality of your website without altering its core code, whether it’s to add an online store, a membership system, or improve SEO further.
Depending on your specific use case, a plugin or two might be all it takes to transform your website from a cool project into a powerful e-commerce platform.

Using the Statsig headless CMS
While the core of our site remains hardcoded, we leverage a headless CMS model to quickly publish, change, and delete web pages and content without needing to mess with code. For marketers, this level of freedom and flexibility is ideal for moving quickly without burdening the front-end team.
Our CMS is responsible for numerous types of content on our website, including:
Blog posts
Authors (content model)
Inline CTAs (content model)
Landing pages
Embeddable content models, like cards and forms
Product updates
Custom code blocks
And 20-some more
Let’s take a closer look at a traditional use case: How our blog and its supporting content models work together to render a blog post:
Authors
Our authors content model (or ‘collection’ in Webflow terms) was one of the first content models we created.
I knew we wanted to offer our users a good blog experience, and one of the parts of this meant having author headshots, titles, links to social media profiles, and so on. Rather than including this information in every single blog post, I decided to break it out into its own content model.
This means we can set it and forget it. Creating an author is straightforward, and during the blog publishing process we can just link each post to its author. Simple.
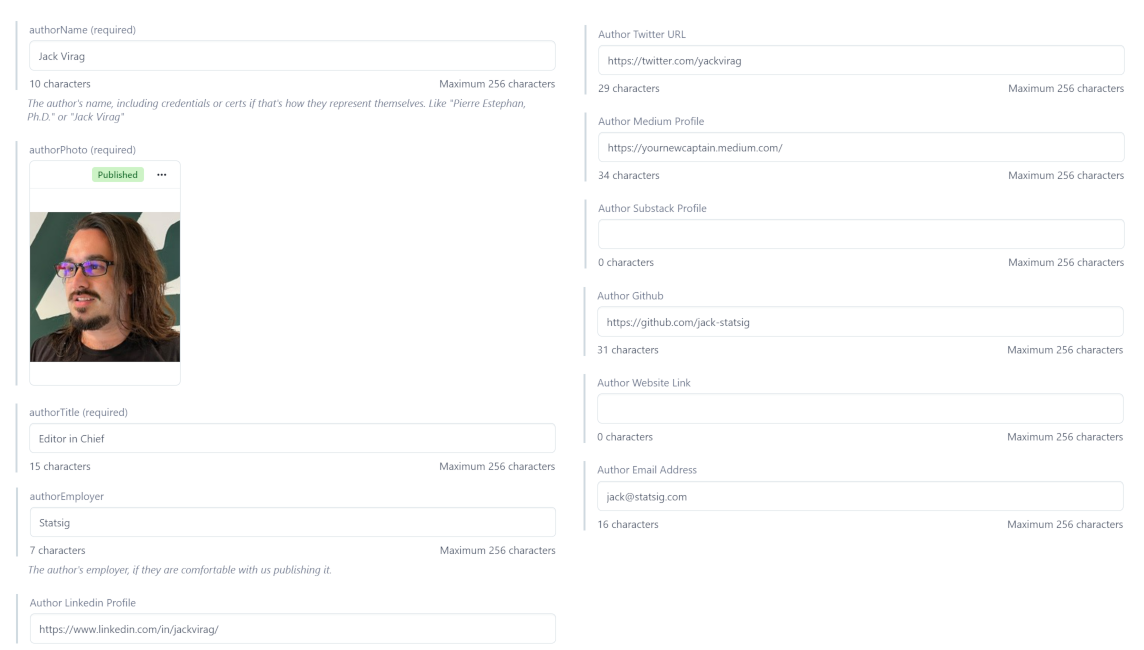
These are the available fields in Contentful for authors. Only a handful of them are required. Others, like social media profiles, are not.

This is a screenshot of a live blog post’s author content model. Here we can see the content model populating the authors module just below the blog post title. On the right are the social icons that each link to the author’s social media profiles, as determined by the CMS fields.
If the author doesn’t list a URL for a given social media platform, the icon doesn’t show up. We designed it this way because—obviously—different authors will use different social media platforms.
Inline CTAs
Inline CTAs are an important tool in marketing, and are one of the big reasons we chose to use a CMS for blog posts.
The philosophy behind inline CTAs is that you want your buttons and links to be helpful and relevant to your users. If there’s a section of your blog post where you’re discussing your sandbox project, for instance, you’d want to be able to embed a CTA right then and there so that interested users can click it.
To that end, it’s important to be able to make custom CTAs on the fly, rather than having to choose a pre-made one. Anything otherwise would be a big missed opportunity.
We make inline CTAs directly in our content management system.
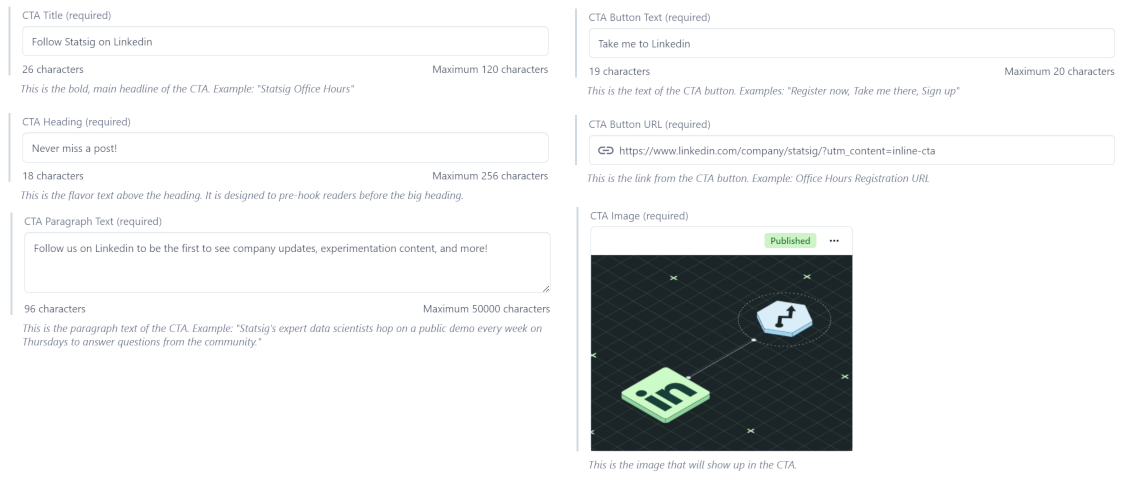
These are the fields for our “Statsig on Linkedin” CTA. I’ll embed a live, clickable version below so that we can see how it renders:
Follow Statsig on Linkedin

Since these are made with our CMS, we can make as many as we want with hardly any ramp-up time, and can embed them within any content type—not just blog posts. This is super useful for guest posts, when we might want CTAs that externally link to the guest author’s website.
Blogs
As you can imagine, our blog—on the backend—is also a collection of fields just like the other content models we’ve discussed. Publishing a blog using a content management system is much like filling out a long form with a rich text field smack-dab in the middle of it. I’m sorry if this spoils the magic for you.
Since our blog content model contains tons of fields, I’ll summarize them instead of posting a giant screenshot:
Titles and descriptions for both on-page elements and meta tags.
A rich text field for the blog content, with the ability for other content models to be embedded within it, like custom code, CTAs, tables, and so on.
Hero images including the cover image, opengraph (social media preview) image, etc
Basic website stuff like publish date, whether the post is ‘featured’ or not, and tags
The end result of using a headless CMS for this is that every author of blog posts—whether a freelancer, marketing writer, or Statsig employee in general—can ship posts quickly without any overhead, tinkering with the website, or trial and error to get formatting right. The CMS also allows us the flexibility to alter blog posts with embeds and CTAs that are relevant and keep users interested.
The end result is the blog you're reading today!
Before we had a CMS
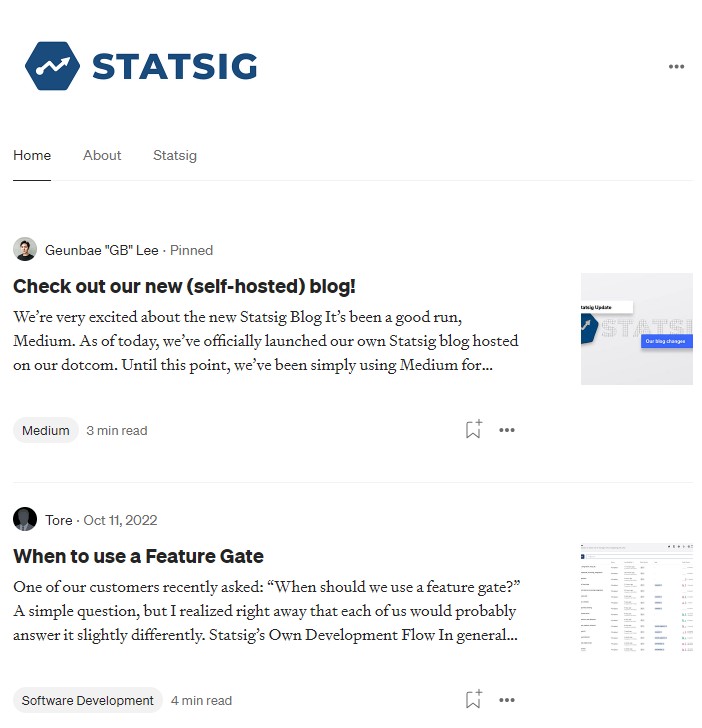
Once upon a time, back when Statsig was new, we used a simple Medium integration to serve as a temporary content management system for blog posts. When users clicked “blog” in our nav menu, it took them to our Medium domain:
To put it simply, Medium is a great way to manage blog content as long as you’re happy with users not clicking through to your website. The lack of customizability in terms of guiding user flow is difficult to overcome.
When reading a company Medium blog, the bottom section features links to other Medium articles that are not your own—providing a neat way to say goodbye to your readers. There’s also no custom header and footer or other navigable elements to keep interested readers sticking around.
Another big downside of using Medium is that it lacks flexibility around embedding content. Since Medium is incentivized to provide a homogenous reading experience to all of its users, they’re generally against allowing for embedded code, inline CTAs, forms, and the like.
Pros of Medium
Works out of the box as a generic content management system
Role-based access to make contribution easy
Publishing on a platform that has millions of monthly readers
Cons of Medium
Lack of customization: It’s not your website
No embeddable content
Doesn’t drive traffic to website
Migrating from Medium to Contentful
Migrating from Medium to Contentful was one of my first big projects, and I started where any content marketer would: The blog.
The decision to migrate the blog first provided a good opportunity to test the CMS’s limits and customization, as blog posts require additional content models to be embedded within them, like the authors and CTAs we discussed earlier.
Our frontend engineer (and hacker) Vijaye wrote some code that would digest the content from our existing blog posts—we had about 80—and add them to plaintext fields within our new CMS. This was a good opportunity to ensure each post followed very basic SEO best practices and apply our newly written blog style guide to them. (Goodbye reference links, hello inline anchor text!)
We also needed to save every single blog image locally and re-upload it to Contentful, which took a while:
Launching the blog as our first CMS-served content model provided a good moment to score some quick wins. We configured our content management system to automatically turn the image filenames (stored locally) into the alt text of the image upon being uploaded. This ensured that 100% of images in our CMS adhere to accessibility standards (as long as the filenames are concise).
We also resized a few of our biggest images so that the blog pages load more quickly. We usually shoot for <200kb for blog images, so that even posts with a lot of pictures don't slow our web pages down.
Further, we put some thought upfront into how we wanted our authors to be represented. With our new content model, all author images would be 200x200 pixels to ensure quick loading times and no issues with resizing and scaling.
Now, author images could safely be added to each blog post, which is great for a number of reasons. For one, users should see who wrote each post (and be able to click to follow them on social media), but also potential guest authors might look forward to seeing their own name and face on a Statsig blog post.
Author's note: Yes, we love guest posts!
Lastly, having to rewrite every single blog post and transform it from plaintext into rich text gave me extremely deep insights into our content thus far, which is a good advantage to have when determining future content and marketing strategy.
Not many marketers can say “Yes, I read every single word of every blog post within my first week.”
Using a CMS with Statsig
Related reading: For a detailed guide including setup documentation, please see our documentation on CMS integrations.
CMS users can leverage Statsig to significantly enhance their website's functionality, allowing for more dynamic and data-driven content delivery. Here’s how you can seamlessly integrate a CMS with Statsig to leverage the best of both worlds:
Step 1: Choose your CMS
Select a CMS that fits your needs. Whether it’s a traditional CMS like Webflow or a headless CMS like Contentful, ensure it aligns with your site’s structure and content strategy. Be sure to consider all factors as they pertain to scaling.
Step 2: Integrate with Statsig
This involves setting up the Statsig SDK in your website’s codebase. Statsig’s documentation provides detailed guides on integrating its SDK with various programming languages and frameworks.
Step 3: Leverage feature flags
With Statsig, you can use feature flags to control which content or features from your CMS are shown to different user segments.
This can be particularly useful for A/B testing different content strategies or layouts. Once you’ve set up feature flags in Statsig, you can use them to toggle different content pieces or page layouts in your CMS.
Step 4: Experiment with content ✨✨✨
This is where the fun begins! You can create experiments in Statsig to see how changes in your CMS affect user behavior, engagement, or conversion rates. This might involve testing different blog post formats, page layouts, or even personalized content for different user groups.
If you wonder about it, test it.
Step 5: Analyze and optimize
When you use Statsig with a CMS, Statsig will provide detailed analytics on how different content versions perform, helping you make informed decisions about your content strategy. Analyze metrics like page views, bounce rates, and user engagement to understand what content resonates with your audience, or take a deep dive into Metrics Explorer to see effects as granularly as possible.
Step 6: Iterate based on data
Finally, you should be continuously using the data and insights you gather from Statsig to iterate on your content. The combination of a robust CMS and Statsig’s powerful analytics can drive your content strategy to new heights.
Get started now!